Creating widgets#
Widgets are small composable graphical elements that can be added to the napari user
interface. The easiest way to add a widget is by using
magicgui, a Python package that assists
in building widgets. It is a general abstraction layer on GUI toolkit backends (like
Qt), with an emphasis on mapping Python types to widgets. This enables you to easily
create widgets using annotations.
If you require more extensibility though, you can create your own widget class that
subclasses QtWidgets.QWidget.
This document will describe each widget creation method, in increasing order of extensibility;
creating a widget from a function and
magicgui(simplest but least extensible and flexible)create a widget class that subclasses a
magicguiwidget classcreate a widget class that subclasses
QtWidgets.QWidget(most extensible but also the most difficult to implement)
More examples of widget use can be found in the ‘GUI’ gallery examples (note: not every example includes a widget). Additionally, cookiecutter-napari-plugin has more robust widget examples that you can adapt to your needs.
There are two ways to then add a widget to a napari viewer:
via
napari.qt.Window.add_dock_widget()in a Python script or interactive console (see How to launch napari for details on launching and interacting programmatically with napari)by adding a widget contribution in a plugin.
There is an important implementation distinction between the two methods;
add_dock_widget() expects an instance of a widget, like
an instance of class FunctionGui or
qtpy.QtWidgets.QWidget, whereas
widget contributions, expect a callable
(like a function or class) that will return a widget instance. When describing
each of the three widget creation methods below, we will first show how to create a
widget and add it to the viewer
with add_dock_widget(), then how to adapt the widget
for a widget contribution.
magicgui decorated functions#
magicgui makes building widgets to represent
function inputs easy via the
magicgui.magicgui
decorator:
from magicgui import magicgui
import datetime
import pathlib

@magicgui(
    call_button="Calculate",
    slider_float={"widget_type": "FloatSlider", 'max': 10},
    dropdown={"choices": ['first', 'second', 'third']},
)
def widget_demo(
    maybe: bool,
    some_int: int,
    spin_float=3.14159,
    slider_float=4.5,
    string="Text goes here",
    dropdown='first',
    date=datetime.datetime.now(),
    filename=pathlib.Path('/some/path.ext')
):
    ...

widget_demo.show()
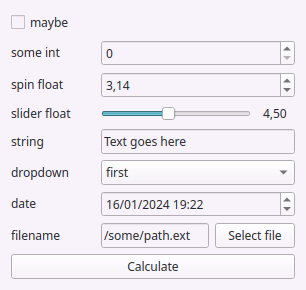
magicgui uses type hints to infer
the appropriate widget type for a given function parameter, and to indicate a
context-dependent action for the object returned from the function (in the
absence of a type hint, the type of the default value will be used). You can also
customize your widget using
magicgui.magicgui
parameters. In the example above, call_button specifies the button text and the
param_options slider_float and dropdown let you customize the widget
associated with those function parameters.
Third party packages (like napari in this case) may provide support for their types
using
magicgui.register_type.
Indeed napari uses
magicgui.register_type
to provide support for napari-specific type annotations. This makes it easy to
use magicgui to build widgets in napari. Note all type annotations below require
that the resulting widget be added to a napari viewer.
Below we demonstrate how to create a simple threshold widget using magicgui and add
it to the viewer. Note the auto_call parameter tells magicgui to call the function
whenever a threshold_magic_widget parameter changes, thus the function is called
as soon as we add the ‘camera’ image.
from skimage import data
from skimage.util import img_as_float

import napari

@magicgui(
    threshold={"widget_type": "FloatSlider", "max": 1}, auto_call=True
)
def threshold_magic_widget(
    img_layer: "napari.layers.Image", threshold: "float"
) -> "napari.types.LabelsData":
    return img_as_float(img_layer.data) > threshold

# Create the viewer and add an image
viewer = napari.view_image(data.camera())
# Add widget to viewer
viewer.window.add_dock_widget(threshold_magic_widget)

Below we first document how to use napari-specific
parameter and
return type annotations to easily create your own
widgets. We then explain how to use
magicgui function widgets in plugin widget contributions.
Note
For a more complex example of a magicgui.magicgui widget, see the
gaussian blur example
in the magicgui documentation.
Parameter annotations#
The following napari types may be used as parameter type annotations in
magicgui functions to get information from the napari viewer into your
magicgui function.
the napari
Layerclassany of the
<LayerType>Datatypes fromnapari.types, such asnapari.types.ImageDataornapari.types.LabelsData
The consequence of each type annotation is described below:
Annotating as a Layer subclass#
If you annotate one of your function parameters as a
Layer subclass (such as Image or
Points), it will be rendered as a
ComboBox widget (i.e. “dropdown menu”), where the
options in the dropdown box are the layers of the corresponding type currently
in the viewer.
from napari.layers import Image

@magicgui
def my_widget(image: Image):
    # do something with whatever image layer the user has selected
    # note: it *may* be None! so your function should handle the null case
    ...
Here’s a complete example:
import napari
import numpy as np
from napari.layers import Image

@magicgui(image={'label': 'Pick an Image'})
def my_widget(image: Image):
    ...

viewer = napari.view_image(np.random.rand(64, 64), name="My Image")
viewer.window.add_dock_widget(my_widget)
Note the widget on the right side with “My Image” as the currently selected option

Annotating as Layer class#
In the previous example, the dropdown menu will only show
Image layers, because the parameter was annotated as an
Image. If you’d like a dropdown menu that allows the
user to pick from all layers in the layer list, annotate your parameter as
Layer
from napari.layers import Layer

@magicgui
def my_widget(layer: Layer):
    # do something with whatever layer the user has selected
    # note: it *may* be None! so your function should handle the null case
    ...
Annotating as napari.types.*Data#
In the previous example, the object passed to your function will be the actual
Layer instance, meaning you will need to access any
attributes (like layer.data) on your own. If your function is designed to
accept a numpy array, you can use any of the special <LayerType>Data types
from napari.types to indicate that you only want the data attribute from
the layer (where <LayerType> is one of the available layer types). Here’s an
example using napari.types.ImageData:
from napari.types import ImageData
import numpy as np

@magicgui
def my_widget(array: ImageData):
    # note: it *may* be None! so your function should handle the null case
    if array is not None:
      assert isinstance(array, np.ndarray)  # it will be!
Like above, it will be rendered as a ComboBox.
Annotating as napari.Viewer#
Lastly, if you need to access the actual Viewer instance
in which the widget is docked, you can annotate one of your parameters as a
napari.Viewer. This will not automatically render as a
ComboBox so you will need to
specify the widget option
to map this parameter to.
from napari import Viewer

@magicgui
def my_widget(viewer: Viewer):
  ...
Caution
Please use this sparingly, as a last resort. If you need to add layers to the viewer from your function, prefer one of the return-annotation methods described below. If you find that you require the viewer instance because of functionality that is otherwise missing here, please consider opening an issue in the napari issue tracker, describing your use case.
Return annotations#
The following napari types may be used as return type annotations in magicgui
functions to add layers to napari from your magicgui function:
napari
Layerclass or any of its subclasses, such asImageorPointsany of the
<LayerType>Datatypes fromnapari.types, such asnapari.types.ImageDataornapari.types.LabelsDatanapari.types.LayerDataTupleLists ofnapari.layers.Layerornapari.types.LayerDataTuple
The consequence of each type is described below:
Returning a Layer subclass#
If you use a Layer subclass as a return annotation on a
magicgui function, napari will interpet it to mean that the layer returned
from the function should be added to the viewer. The object returned from the
function must be an actual Layer instance.
from napari.layers import Image
import numpy as np

@magicgui
def my_widget(ny: int=64, nx: int=64) -> Image:
  return Image(np.random.rand(ny, nx), name='my Image')
Here’s a complete example
@magicgui(call_button='Add Image')
def my_widget(ny: int=64, nx: int=64) -> Image:
  return Image(np.random.rand(ny, nx), name='My Image')

viewer = napari.Viewer()
viewer.window.add_dock_widget(my_widget, area='right')
my_widget()  # "call the widget" to call the function, so it shows in the
             # screenshot below.
             # Normally this would be caused by clicking on 'Add Image' button
Note the new “My Image” layer in the viewer as a result of having called the widget function.

Note
With this method, a new layer will be added to the layer list each time the
function is called. To update an existing layer, you must use the
LayerDataTuple approach described below
Returning List[napari.layers.Layer]#
You can create multiple layers by returning a list of
Layer.
from typing import List

@magicgui
def make_points(...) -> List[napari.layers.Layer]:
  ...
Note
Note: the List[] syntax here is optional from the perspective of napari. You
can return either a single Layer or a list of Layers and they will all be added
to the viewer as long as you annotate with either List[napari.layers.Layer] or
napari.layers.Layer. If you want your code to be properly typed, however,
your return type must match your return annotation.
Returning napari.types.*Data#
In the previous example, the object returned by the function had to be an actual
Layer instance (in keeping with the return type
annotation). In many cases, you may only be interested in receiving and
returning the layer data itself. (There are
many functions already written that accept and return a numpy.ndarray, for
example). In this case, you may use a return type annotation of one the special
<LayerType>Data types from napari.types to indicate that you want data
returned by your function to be turned into the corresponding
Layer type, and added to the viewer.
For example, in combination with the ImageData paramater
annotation described above:
from napari.types import LabelsData, ImageData

@magicgui(call_button='Run Threshold')
def threshold(image: ImageData, threshold: int = 75) -> LabelsData:
    """Threshold an image and return a mask."""
    return (image > threshold).astype(int)

viewer = napari.view_image(np.random.randint(0, 100, (64, 64)))
viewer.window.add_dock_widget(threshold)
threshold()  # "call the widget" to call the function, so it shows in the
             # screenshot below.
             # Normally this would be caused by clicking on 'Run Threshold' button

Returning napari.types.LayerDataTuple#
The most flexible return type annotation is napari.types.LayerDataTuple:
it gives you full control over the layer that will be created and added to the
viewer. It also lets you update an existing layer with a matching name.
A LayerDataTuple is a tuple in one of the
following three forms:
(layer_data,)a single item tuple containing only layer data (will be interpreted as an ‘image’ layer).
(layer_data, {})a 2-tuple of
layer_dataand a metadatadict. the keys in the metadatadictmust be valid keyword arguments to the correspondingnapari.layers.Layerconstructor.
(layer_data, {}, 'layer_type')a 3-tuple of data, metadata, and layer type string.
layer_typeshould be a lowercase string form of one of the layer types (like'points','shapes', etc…). If omitted, the layer type is assumed to be'image'.
The following are all valid napari.types.LayerDataTuple examples:
# an image array
(np.random.rand(64, 64),)

# an image with name and custom blending mode
(np.random.rand(64, 64), {'name': 'My Image', 'blending': 'additive'})

# an empty points layer
(None, {}, 'points')

# points with properties
(np.random.rand(20, 2), {'properties': {'values': np.random.rand(20)}}, 'points')
An example of using a LayerDataTuple return annotation in
a magicgui function:
import napari.types

@magicgui(call_button='Make Points')
def make_points(n_points=40) -> napari.types.LayerDataTuple:
  data = 500 * np.random.rand(n_points, 2)
  props = {'values': np.random.rand(n_points)}
  return (data, {'properties': props}, 'points')

viewer = napari.Viewer()
viewer.window.add_dock_widget(make_points)
make_points()  # "call the widget" to call the function, so it shows in the
               # screenshot below.
               # Normally this would be caused by clicking on 'Make Points' button

Returning List[napari.types.LayerDataTuple]#
You can also create multiple layers by returning a list of
LayerDataTuple.
from typing import List

@magicgui
def make_points(...) -> List[napari.types.LayerDataTuple]:
  ...
Note
Note: the List[] syntax here is optional from the perspective of napari. You
can return either a single tuple or a list of tuples and they will all be added
to the viewer as long as you annotate with either List[napari.types.LayerDataTuple]
or napari.types.LayerDataTuple. If you want your code to be properly typed, however,
your return type must match your return annotation.
Updating an existing Layer#
The default behavior is to add a new layer to the viewer for each
LayerDataTuple returned by a magicgui function. By specifying the value of
name key in your LayerDataTuple metadata dict to be the name
of an existing layer, you can update this layer, rather than creating a new layer each
time the function is called:
@magicgui(call_button='Make Points', n_points={'maximum': 200})
def make_points(n_points=40) -> napari.types.LayerDataTuple:
  data = 500 * np.random.rand(n_points, 2)
  # 'My Points' is the name of an existing layer
  return (data, {'name': 'My Points'}, 'points')

viewer = napari.Viewer()
viewer.window.add_dock_widget(make_points)
# calling this multiple times will just update 'My Points'
make_points()
make_points.n_points.value = 80
make_points()
make_points.n_points.value = 120
make_points()
Avoid imports with forward references#
Sometimes, it is undesirable to import and/or depend on napari directly just to provide type annotations. It is possible to avoid importing napari entirely by annotating with the string form of the napari type. This is called a Forward reference:
@magicgui
def my_func(data: 'napari.types.ImageData') -> 'napari.types.ImageData':
    ...
Tip
If you’d like to maintain IDE type support and autocompletion, you can
do so by hiding the napari imports inside of a typing.TYPE_CHECKING
clause:
from typing import TYPE_CHECKING

if TYPE_CHECKING:
  import napari

@magicgui
def my_func(data: 'napari.types.ImageData') -> 'napari.types.ImageData':
    ...
This will not require napari at runtime, but if it is installed in your development environment, you will still get all the type inference.
magicgui function widgets as plugin contributions#
Recall above that plugin
widget contributions expects a callable that returns
a widget instance, whereas add_dock_widget() expects an
instance of a widget. The add_dock_widget() examples
above can be easily adapted to be plugin widgets by using
the @magic_factory decorator instead of the
@magicgui decorator.
For example, the threshold widget shown above could be provided as a napari plugin as follows:
from magicgui import magic_factory
from napari_plugin_engine import napari_hook_implementation

@magic_factory(auto_call=True, threshold={'max': 2 ** 16})
def threshold(
    data: 'napari.types.ImageData', threshold: int
) -> 'napari.types.LabelsData':
    return (data > threshold).astype(int)
This function can now be added to the plugin manifest as a widget contribution. See the widget contribution guide for details.
Alternatively, you can also directly subclass FunctionGui
(which is the type that is returned by the @magicgui
decorator). This method would give you more control over your widget.
See widget classes below for more.
Note
@magic_factory behaves very much like
functools.partial(): it returns a callable that “remembers” some or
all of the parameters required for a “future” call to magicgui.magicgui().
The parameters provided to @magic_factory can
also be overridden when creating a widget from a factory:
@magic_factory(call_button=True)
def my_factory(x: int):
    ...

widget1 = my_factory()
widget2 = my_factory(call_button=False, x={'widget_type': 'Slider'})
Widget classes#
Generating a widget by creating a widget class allows you to have more control over
your widget. Your widget class must subclass magicgui.widgets.bases.Widget
(i.e., a
magicgui widget class)
or QtWidgets.QWidget.
It can then be added to the napari viewer
by instantiating the widget class, then adding this via
add_dock_widget(). You can also create a plugin and add
your widget class (not instantiated widget) as a
widget contribution.
Below we will detail how to use various parent classes to generate a widget.
There are several magicgui widget classes so we will only document the use of the
two most useful in the napari context; FunctionGui and
Container.
We will begin with the simplest but least extensible parent class and end with the
parent class the most extensible.
magicgui.widgets.FunctionGui#
Creating a widget by subclassing FunctionGui is similar in
principle to using the @magicgui decorator. Decorating
a function with @magicgui is equivalent to passing
the same function to FunctionGui’s function parameter.
The remaining FunctionGui parameters essentially
mirror @magicgui’s parameters.
Indeed, FunctionGui is the type that is returned by
@magicgui. Subclassing
FunctionGui however, gives you access to the
native QWidget of your widget, allowing you change its appearance and add
custom elements.
from magicgui.widgets import FunctionGui

import napari

def my_function(...):
    ...

class MyGui(FunctionGui):
    def __init__(self):
        super().__init__(
          my_function,
          call_button=True,
          layout='vertical',
          param_options={...}
        )
        # do whatever other initialization you want here

# Create a `viewer`
viewer = napari.Viewer()
# Instantiate your widget
my_widg = MyGui(my_function)
# Add widget to `viewer`
viewer.window.add_dock_widget(my_widg)
Class widgets are easy to use as plugin widget contributions. Simply provide the class definition and add to the plugin manifest.
magicgui.widgets.Container#
The Container allows you to build more complex widgets
from sub-widgets. This gives you more control over each sub-widget and how callbacks
are connected to events but you can still use the convenient magicgui widget
generation features as shown below.
from magicgui.widgets import Container, create_widget

class ImageThreshold(Container):
    def __init__(self, viewer: "napari.viewer.Viewer"):
        super().__init__()
        self._viewer = viewer
        # use create_widget to generate widgets from type annotations
        self._image_layer_combo = create_widget(
            label="Image", annotation="napari.layers.Image"
        )
        self._threshold_slider = create_widget(
            label="Threshold", annotation=float, widget_type="FloatSlider"
        )

        # connect your own callbacks
        self._threshold_slider.changed.connect(self._threshold_im)
        # append into/extend the container with your widgets
        self.extend(
            [
                self._image_layer_combo,
                self._threshold_slider,
            ]
        )

    def _threshold_im(self):
        image_layer = self._image_layer_combo.value
        if image_layer is None:
            return

        image = img_as_float(image_layer.data)
        name = image_layer.name + "_thresholded"
        threshold = self._threshold_slider.value
        thresholded = image > threshold
        # Update existing layer (if present) or add new labels layer
        if name in self._viewer.layers:
            self._viewer.layers[name].data = thresholded
        else:
            self._viewer.add_labels(thresholded, name=name)

# Create a `viewer`
viewer = napari.Viewer()
# Instantiate your widget
my_widg = ImageThreshold()
# Add widget to `viewer`
viewer.window.add_dock_widget(my_widg)
As above to turn this into a plugin widget contribution, simply provide the class definition and add to the plugin manifest.
QtWidgets.QWidget#
For the most control over your widget, subclass
QtWidgets.QWidget:
from qtpy.QtWidgets import QHBoxLayout, QPushButton, QWidget

class ExampleQWidget(QWidget):
    def __init__(self, viewer: "napari.viewer.Viewer"):
        super().__init__()
        self.viewer = viewer

        btn = QPushButton("Click me!")
        btn.clicked.connect(self._on_click)

        self.setLayout(QHBoxLayout())
        self.layout().addWidget(btn)

    def _on_click(self):
        print("napari has", len(self.viewer.layers), "layers")

# Create a `viewer`
viewer = napari.Viewer()
# Instantiate your widget
my_widg = ExampleQWidget()
# Add widget to `viewer`
viewer.window.add_dock_widget(my_widg)
As above to turn this into a plugin widget contribution, simply provide the class definition and add to the plugin manifest.